BACK TO THE WINTER FOR FAMILIES PAGE
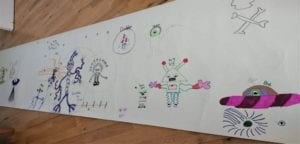 One of my favourites is to get a roll of cheap wallpaper or any leftovers you have and roll it out across the floor. Give the kids their pens/pencils/crayons and let them all fill in a section with their drawings. This is a great way for them all to do something together but not get (too much) in each other’s way. Sometimes its good to have a theme, the last time we did it, our theme was aliens and it was great to see what weird and wonderful creatures and spaceships the kids came up with. Or you can let them paint on the wallpaper but this is best to be done on a wooden floor or with a large plastic groundsheet.
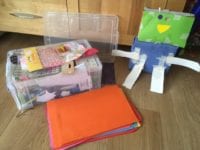 My kids do this at school and love it so we now have a box at home full of crafty items – coloured paper, stickers, foam shapes, old cereal boxes, yogurt pots, lids, paint, fluffy balls, glitter, glue…anything will do. We also cut out pictures from old birthday cards and use them.
Here’s a latest creation – a ‘robot’. Unfortunately, this is the only example of our junk modelling I can find, all the rest has ended up in the bin because it’s, well…junk!
I love doing these for my kids, they take a bit of planning but keep them busy for ages. I usually do a themed one at Easter and Christmas where I write clues and put little treats and they find their way around the house collecting them. An easier way is to just hide things to find, some ideas are –
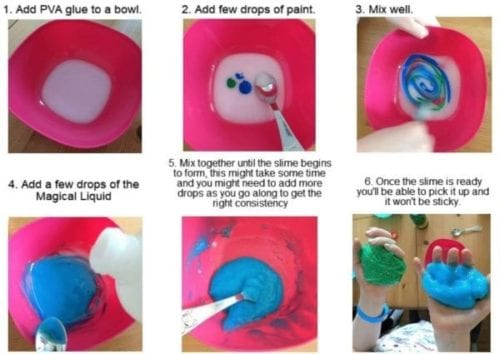
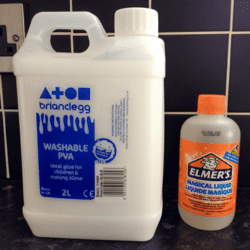 I hate it but kids love it. We’ve tried several recipes for home-made slime, with varying rates of success, but now have the perfect solution. Elmers Magical Liquid (costs around £5 online or in places like Hobbycraft), all you need to do is add a few drops of this to some PVA glue and mix together, and it creates good slime. The good thing about this is that it’s 100% safe for kids, you only need 2 ingredients and you can make it in small quantities. To colour the slime, you can just add a drop or two of paint to the glue before you start. I found that you need quite a lot of the Elmer’s liquid to make sure the slime isn’t too sticky.
Other slime recipes we have tried successfully are –
100mls PVA glue, Laundry Starch (1tsp mixed with a small amount of warm water until it resembles milk), a few small drops of poster paint or food colouring. Put 100mls of glue into a pot and add a couple of drops of paint. Prepare the starch solution and slowly add this to the glue and mix. When the glue starts coming away from the sides of your pot, your slime is almost ready. Keep mixing until it has all come together in a lump which can be picked up. If your slime is too sticky, try adding more starch solution, if it’s too hard and not stretchy, add more warm.
PVA glue, Contact Lens Solution, poster paint. Put 100mls glue in a pot, add the paint, mix, then slowly add the contact lens solution until your slime starts to form.
My kids used to love playing with play-doh but it goes hard quickly so I tried making some. You can find loads of different recipes on the internet on how to make play dough; this is one I found on the BBC website which we did in 10 minutes:
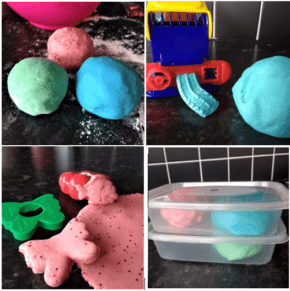 8 tbsp plain flour, 2 tbsp salt, 60mls warm water, food colouring or paint, 1 tbsp vegetable oil. Mix the flour and the salt together in a bow. In a separate bowl mix the water, oil and food colouring (we used poster paint) together. Slowly pour the liquid into the flour and mix. Once the dough has formed into a ball, flour a surface and knead the dough until it is smooth and pliable.
Make a few batches in different colours, and you are ready to go. We also added glitter to some of our dough. Store the dough in a sealed container or bag in the fridge.
Play Dough Ornaments – Kids love to make things to keep, and although the play dough above is great for saving to play with again on another day, creating ornaments out of dough is also a great rainy-day activity. The recipe is slightly different to the above.
 Dough Ornament Recipe (NOT FOR EATING!) – 4 cups plain flour, 1 cup salt, 1½ cups of water (approx.) Mix all the dry ingredients together, then slowly add the water while mixing (be careful not to add too much because the dough will be too soggy). Keep mixing until it comes together as a dough. Knead the dough on a floured surface until it is smooth, pliable and not sticky to touch. Roll out flat and use cookie cutters or play dough cutters to create shapes. If you are going to use these as hanging decorations, remember to pierce a hole through the top of the ornament, ready for the hanging thread. Place on a baking tray, lined with grease proof paper, and bake at 150 degrees or gas mark 3 for 45 minutes then when cooled paint/decorate as required.
My kids love to bake, they usually make a complete mess but the results are worth the clean up! The key is to find a couple of simple recipes that children can really get involved in without too much chaos, and most importantly enjoy eating the end result. Here are a couple of suggestions:
Easy Rocky Road (no measuring or oven baking required actually)
Ingredients
Method
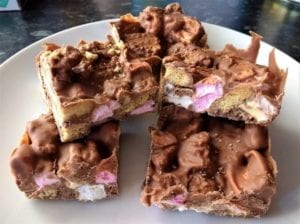 This is the one of the easiest things I have ever made with my kids and the results are usually delicious.
Rice Crispie Buns (also no baking required!)
Ingredients
Method
Optional – You can decorate these buns with sprinkles and melted chocolate if you wish for extra tastiness. Because we made these at Easter we added some mini eggs.
 Lego is always fun, especially if you have a good imagination. We bought a huge tub full of second hand Lego and the children have loved making various creations using all the different blocks. You can set challenges such as be the first one to build a house or who can make the coolest car. You can also create little challenges for them by drawing a series of block patterns on paper and they must reconstruct it with the blocks.
Kids love making a mess, and you can give them 30 minutes of fun by using dry goods from your kitchen cupboards. Grab a tray and pour some dry rice or pasta shapes onto it. Then give them some toy cups, bowls, and spoons and let them play. You can also fill a bowl with rice and hide toys in it for them to find – my son used to love digging out his toy cars. Another favourite is coloured rice –
Pour some dry rice into a lidded container. Add 1 teaspoon of vinegar and a few drops of food colouring, put the lid on and shake until the rice is coated. Spread out on a tray to dry. Try it with different colours to get the above effect. Obviously coloured rice is so much more exciting than plain white rice. The good thing about this is that it’s all dry so despite the mess it can easily be cleared up and won’t cause any permanent mess/damage/stains.
Grab some popcorn, chocolate, snacks, get the blankets & cushions down, shut the curtains and put on the kid’s favourite movie. They will love this treat at home during the day with you. Make it into a longer activity by asking them to make posters for the cinema and the film, make tickets to ‘sell’, label seats and show to where you are sitting.
Have an indoor picnic! Lay your tablecloth on the floor and put together lots of buffet style snacks like crackers, sausage rolls, cheese, grapes, crisps, breadsticks. Lay them all out in little bowls and let your kids have a picnic. They’ll love the thrill of not having to eat at the table.